


Best and Efficient Ways Boost UP your internet Speed 100% working :

Slow internet browsing and Downloading speed , how irritating ? Are you suffering from low internet speed on PC while you trying to connect internet through 2G or 3G dongle( data modem). I am also using 2G network for blogging but i never feel my internet connection is very slow because i am using some tweaks to boost my internet speed. If you want to increase your internet speed , then follow my instructions:
STEPS TO BOOST YOUR INTERNET SPEED :
warning : before changing anything, make sure to note down your default settings input, it would help you if these tricks doesn't work to you.
1] CHANGING DNS SERVER :
What is DNS?
Domain Name Server or DNS is a server which simply converts the names of websites into their address, IP Address. Could you open Doole wesite by typing
173.194.36.34 in your browser? yeah! you can , but could you remember these long 10 digit number to access google? no, They are hard to remember. But could you
use www.google.com to access Google? yeah! its easy to remember.
DNS server do this for you, it converts www.google.com to 173.194.36.34
so you came to know that DNS plays a major role in internet speed. By switching to a fast and powerful DNS server, you can impreove your internet experience along with speed.
How to change Domain Name in Windows XP :
1.Open Control Panel
2.Switch to 'clasic view'. If you haven't yet.
3.Open 'netwik connections' by double clicking on it.
4.Now select your connection, if it is LAN then select Local Area Network or if it is Modem then select your modem.
5.Right click on your Network Connection, LAN or modem
6.select 'prperties'
7.properties dialog box will appear, now clock on 'Netwirking ' Tab
8.Double click on 'Internet Protocol(TCP/IP)
9.select 'Use the following DNS server addresses:'
10.Now in 'preferred DNS server' Paste the server addresses from given below lists'
11.In 'Alternate DNS sever' Paste Alternate DNS server assress below your preffered server'
12.Click OK, Again Click OK , If prompted again click OK
13.Restart your computer
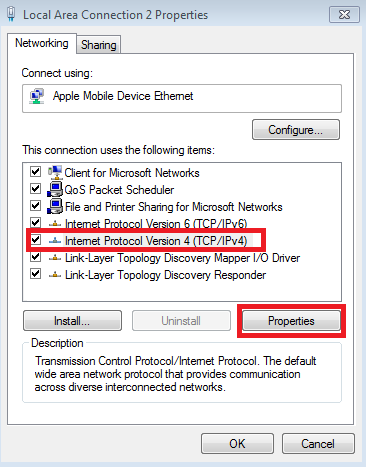

How to change DNS server address in windows Vista, Windows 7 , Windows 8.1 and Windows 10 :
- Open Control Panel.
- On 'Network and Internet' click on 'View Network Status and Tasks'
- A windows will open, in that window on the right side panel in the middle options you can see 'connections' Option click on it
- Another window will popup , on that windows click on 'properties'
- Go to 'Networking' tab
- Double click on 'Internet Protocol Version 4 (TCP/IPv4)
- A window will come , on that window select ' 'Use the following DNS server addresses:'
- Now in 'preferred DNS server' Paste the server addresses from given below lists'
- 9. In 'Alternate DNS sever' Paste Alternate DNS server addssress below your proffered server'
- Click OK, Again Click OK , If prompted again click OK
- Restart your computer.
TOP 10 high Speed DNS Server addresses :
pate any following servers on proffered DNS server and Alternate DNS sever address.
Google:
Preferred DNS server - 8.8.8.8
Alternate DNS server - 8.8.4.4
Comodo DNS:
Preferred DNS server - 8.26.56.26
Alternate DNS server - 8.20.247.20
Norton DNS:
Preferred DNS server - 198.153.192.1
Alternate DNS server - 198.153.194.1
OpenDNS:
Preferred DNS server - 208.67.222.222
Alternate DNS server - 208.67.220.220
Level3:
Preferred DNS server - 209.244.0.3
Alternate DNS server - 209.244.0.4
ScrubIT3:
Preferred DNS server - 67.138.54.120
Alternate DNS server - 207.225.209.77
OpenNIC4:
Preferred DNS server - 69.164.208.50
Alternate DNS server - 216.87.84.211
Public-Root5:
Preferred DNS server - 199.5.157.131
Alternate DNS server - 208.71.35.137
DNS Advantage:
Preferred DNS server - 156.154.70.1
Alternate DNS server - 156.154.71.1
SmartViper:
Preferred DNS server - 208.76.50.50
Alternate DNS server - 208.76.51.51
2] Configuring Bandwidth :
Most of the Windows computer users don't know that the Microsoft has reserved 20% of our internet bandwidth for some of their own purposes like Windows update. By doing some changes on Local group policy of Windows computers, we can use the internet connection's maximum bandwidth.
Steps to perform to boost internet connection using microsoft by 20%:
- Click on Start Menu and type run and hit enter. ( Use Windows key + R )
- Type gpedit.msc on run command and hit enter.
- Now go to Local Group Policy --> Computer Configuration --> Administrative Templates --> Network.
- Now double click on QoS Packet Scheduler
- Then double click on Limit reservable bandwidth

6. Now a window will come , on that window select 'enable' and then make bandwidth to '0(Zero)'. as like below picture:

Finally click on Apply and OK.
3] Turn OFF Automatic Updates :
While you are connected to internet , Microsoft silently using your internet by searching for updates , these are all for only decreasing your internet speed, Updating your PC is required but not forever, so turn OFF Automatic Updates when you need to get full internet speed for only your work.
How to Turn OFF Automatic Updates :
In Windows XP:
1.Open 'Control Panel'
2.Make sure you have 'classic view' enable
3.Double click on 'system'
4.Navigate to 'Automatic Updates' tab
5.From 'Automatic Updates' tab, Uncheck 'keep my computer Up to Date' and hit OK to sabe the settings
In Windows 7, 8.1 and 10 :
It is very easy to find the program in windows 7 , 8.1 and 10 ,
1.Go to search and Type 'automatic upadates' , you can find it right?
2.Go to change settings and in drop menu select 'Never check for Updates'
3.Click on OK.
That's it

4] Using Command Prompt as a Administrator :
By using some commands on cmd you can boost your internet speed , to perform boost using command prompt , you HAVE TO run cmd as a Administrator .
netsh int tcp show global
netsh int tcp set global chimney=enabled
netsh int tcp set global autotuninglevel=normal
netsch int tcp set global congestionprovider=ctcp

While you are connected to internet , Microsoft silently using your internet by searching for updates , these are all for only decreasing your internet speed, Updating your PC is required but not forever, so turn OFF Automatic Updates when you need to get full internet speed for only your work.
How to Turn OFF Automatic Updates :
In Windows XP:
1.Open 'Control Panel'
2.Make sure you have 'classic view' enable
3.Double click on 'system'
4.Navigate to 'Automatic Updates' tab
5.From 'Automatic Updates' tab, Uncheck 'keep my computer Up to Date' and hit OK to sabe the settings
In Windows 7, 8.1 and 10 :
It is very easy to find the program in windows 7 , 8.1 and 10 ,
1.Go to search and Type 'automatic upadates' , you can find it right?
2.Go to change settings and in drop menu select 'Never check for Updates'
3.Click on OK.
That's it
4] Using Command Prompt as a Administrator :
By using some commands on cmd you can boost your internet speed , to perform boost using command prompt , you HAVE TO run cmd as a Administrator .
- Click on Start and Select all programs
- Click on accessories and select command prompt
- Now,run cmd as administrator
- Type following lines in command prompt and hit enter
netsh int tcp show global
netsh int tcp set global chimney=enabled
netsh int tcp set global autotuninglevel=normal
netsch int tcp set global congestionprovider=ctcp
5] Disable Some Application which are using internet on your PC:
Some
applications use your internet connection in background for many things such as
checking for new updates, updating software eyc,
These
applications will use your internet connection every time when you are
connected with internet. Even though it is not required , you can increase the
speed of internet by disabling internet access of this kind of applications.
How can you know
which programs are accessing my internet connection?
Just follow the
given simple steps :
1. Download TCPEye software from HERE
2. Install TCPEye in your Computer
3. If you want to know which programs are
using your internet connection, launch TCPEye program,
4. When you will run TCPEye , you can see
different processes which are using internet connection.
5. If you want to block internet access for
particular program , Right click on that process, and select end process.
6. There might be too many SVCHOST process,
it is suggested to terminate all the SVChost processes and leave only one
SVSHost process.
That's it : follow all the above tips to get full speed of internet and if you can't just try to follow 1,2 and 3 steps.
All the very best
This comment has been removed by the author.
ReplyDeleteThank you..Sanjith.I am really happy to see your comments..
ReplyDeleteI noticed that my internet speeds were getting a bit sluggish. I tried rebooting my router and modem which didn't help at all. I changed my DNS to Google as per your suggestion and now my speeds are back up to where they should be.
ReplyDeleteInternet Service Provider