Showing posts with label PC Tips and Tricks. Show all posts

Saturday, 22 November 2014

Access Facebook Chat From your Desktop like a Mobile chat application Digsby

Standard
Have you ever wanted to chat with your Facebook friends without opening a web browser? 


Desktop based application Digsby can allow you to stay connected with all your friends even when you close your web browser. 
This is much similar to chatting with Yahoo! Messenger or Google Talk chat client.

Digsby is a IM + email client tool for windows which helps you to chat with your friends even you are out of the browser. Its just a chat application for windows.
so you can chat with your facebook friends from your desktop like yahoo messenger 

Download Digsby application for windows PC

Know your IP address, DNS Server's address and a lot more about your Internet Connection

Standard

Know your IP address, DNS Server's address and a lot more about your Internet Connection:


Command Prompt can even let you know your IP address. Just type ipconfig/ all in the command prompt and press Enter. Along with your IP address and DNS servers, command prompt will also return a ton of information like your host name, primary DNS suffix, node type, whether IP Routing ,Wins Proxy, and DHCP are enabled, your network adapter's description, your physical (MAC) address etc .

Know if your neighbors are stealing your WiFi connection

Standard
Know if your neighbours are stealing your WiFi connection

command prompt codes


1) Open your browser and visit http://192.168.1.1 or http://192.168.0.1 depending on your router. 

2) Find the tab that mentions “Attached Devices” or something similar.

3) Find the computer name, IP address and MAC Address (sometimes called Physical Address or Hardware Address) of your computer using the previous trick.

4 ) Compare it with those displayed by your router in Step 2. If you notice some strange devices, then your neighbour has been sneaking in on your internet connection and it is best to add a password.


Command Prompt can let you know if someone is connected to your Local Area Connection and using it. Just follow the steps:- 

Shutdown Your Computer or a Remote PC via Command Prompt and Stop Shutdown Process

Standard
Most of us shutdown our computers using the power button given in the Start menu. Some of us use the physical power button on our machines. Very few people actually use other means of shutting down a computer and even less is the number of people who use the command prompt to shutdown a computer.


A reason for this is that most of us don't know that the command prompt can be used to not only shutdown, restart or log off our computer instantly but also to shutdown a remote computer provided you have administrative access. It can also be used to hibernate a computer and give a comment containing the reason for shutdown. This post will show you how to do all this.

A computer running Windows (XP, Vista, 7, 8 or 8.1) with the command prompt working perfectly, i.e. not disabled by a virus.

Initial Steps 

1) Press Windows Key + R.2) Enter CMD and press Enter.This will start the command prompt. Follow the instructions below depending on what you want to do.

Shutdown Local Machine (Your Computer)

Type "shutdown -s" without the quotes in the command prompt and press Enter. Shutdown is the command being executed and the switch -s tells the computer to shutdown.

Restart your Local Computer 

Type "shutdown -r" in the command prompt and press Enter. In this case, the command switch -r is telling the computer to restart after shutdown.

Log Off the Current User

Type "shutdown -l" in the command prompt and press Enter. The -l command switch tells the computer to log off.

Shutdown a Remote Computer

Type "shutdown -s -m \\name of the computer" in the command prompt and press Enter. Replace \\name of the computer with the actual name of the remote computer you are trying to shutdown. As mentioned earlier, you must have administrative access to the computer you are trying to shutdown. To know if you have administrative access, press Windows key + R and then type the name of the computer and press Enter.

Note: If you don't remember the name of the remote computer, you can look for it by opening a list of all the computers you are connected to by executing "net view" in command prompt.

If you can connect to the computer, you will be asked to login with your username and password. Upon entering them, a window will display the list of all the directories available to you. This should help you know whether you can or cannot shutdown the remote computer.

Hibernate a Local Computer

Type in "Rundll32.exe Powrprof.dll,SetSuspendState" without the quotes and press Enter. Your computer should hibernate, if it does not, then you must enable hibernation to do this.

Shutdown your or a remote computer after a specific time

Type "shutdown -s -t 60" to shutdown your computer after 60 seconds. Upon executing this, a countdown timer displaying a warning message will be shown. This command uses the -t command switch followed by a variable (which is 60 in this case) which represents the number of seconds after which the computer will shutdown.

Display a Message containing the reason for shutdown

Type shutdown -s  -t 500 -c "I am tired. I don't want to work anymore." (with the quotes) in the Command Prompt and press Enter. The -c switch is used in the code to give the reason for shutting down and what is followed in quotes will be displayed in the dialog box as the reason. This can be used to display all sorts of funny messages.

One example :- Skynet has become self aware. John Connor did not stop me. You can not use your PC anymore.

Stop a System Shutdown

Type "shutdown -a" and press Enter. This will stop the system from shutting down if the countdown to shut down has not reached 0.


Make Undeletable, Unrenamable Folders

Standard

Make Undeletable, Unrenamable Folders using cmd :

Have you ever wondered how you can make a folder which neither can be deleted nor be renamed. Well, if you have, then you have come to the right place. With this trick, you will be able to create folders in Windows which cannot be renamed or deleted.

Basic Concept
The basic concept behind this trick is the use of Keywords. Keywords are reserved words in any programming language that cannot be used as names of variables. Windows also uses certain keywords in its programming. Some of them are con, aux, lpt1, lpt2, lpt3, lpt4, lpt5, lpt6, lpt7, lpt8 and lpt9.


Make Undeletable and unrenamable folders

A Test
To test this concept, make a new folder in Windows and try to give it a name same as any keyword mentioned above.

Result
Windows will not rename your folder to any of the keyword given above.

Trick
So the question arises, how can we make a folder with a keyword as its name? The solution to this problem is included in Windows itself. As we know that Windows has evolved from D.O.S.(Disk Operating System), its commands can be used in Windows. You can use D.O.S. Programming in Windows to create a folder with a keyword as its name using the steps given below:-
  1. Click on Start.
  2. Click on Run. Type in "cmd" without quotes.
  3. In the Command Prompt Window that opens, type the name of the drive you wish to create your folder in the format <drive-name>: and press Enter. e.g. If you wish to create the undeletable folder in D drive, type "D:" without the quotes. Note that the folder cannot be created in the root of C: drive (if C: is your system drive).
  4. Type this command- "md con\" or "md lpt1\" without the quotes and press Enter. You can choose any of the keywords given above as the name of your folder.

Now Windows will create an undeletable, unrenamable folder in the drive you entered in Step 3. However, the folder can be renamed to another keyword using Windows Explorer.

Deleting the Folder

Although, it is not possible to manually delete the folder, you can delete the folder by typing "rd con\" or "rd lpt1\" in Step 4 instead of "md con\" or "md lpt1\". 

Windows Compatibility: This works on Windows XP, Windows Vista, Windows 7, Windows 8 and Windows 8.1.

Try it yourself to create one such folder which can neither be deleted nor be renamed.

Friday, 14 November 2014

MATRIX NOTEPAD TRICK

Standard
Notepad tricks

Try and prank your friends by using this simple matrix notepad trick and be a member in matrix group.

Inspired by the movie Matrix, this falling code trick is extremely popular on social networking websites. Copy and paste the code given below in Notepad and save the file as "Matrix.bat".

How to create a .bat file using notepad : copy and paste the code in notepad and go to file > save as > (select destination where the file has to save) then select you can see 'file name' and 'Save as type' options first choose All files option from the Save as type drop down menu and then enter the file name same as  ' matrix.bat ' (without quotes)

copy the below code :

@echo off
color 02
:tricks
echo %random%%random%%random%%random%%random%%random%%random%%random%random%random%random%random%random%random%
goto tricks


Tuesday, 4 November 2014

Create Bootable USB Drive of Windows Setup without Using Any Software.

Standard

How to Create Bootable USB Drive of Windows Setup without Using Any Software?


               As you know, a bootable USB drive comes handy in many situations such as re-installing Windows Operating System or recovering from critical errors (like refreshing your PC, etc). There are several free tools available such as PowerISO, Rufus and windows 7 USB/DVD download Tool and Microsoft's official  to create bootable USB drive to install .

               But did you know you can create bootable USB drives of Windows setup without using any extra software? Yes, you heard it right. By following a few simple steps, you can make your own bootable USB drive to install Windows OS without any 3rd party software.

This manual method requires only 3 steps:

STEP 1: Format USB drive (optional)
STEP 2: Mount or extract Windows setup ISO file
STEP 3: Copy Windows setup files to USB drive

Please note that this method can be used to create bootable USB drive of Windows Vista, Windows 7, Windows8/8.1 and Windows 10. This method doesn't work for Windows XP bootable USB drive.

So without any further delay let's start the tutorial:

STEP 1: Prepare USB Drive as Per Requirements :

If you want to make Windows Vista or Windows 7 bootable USB drive, a 4GB USB drive will be sufficient. But, if you want to make a bootable drive of Windows 8, Windows 8.1 or Windows 10, you'll need an 8GB USB drive.

Now format the USB drive using FAT32 or NTFS file system. We recommend formatting the USB drive using NTFS file system for better compatibility with newer Windows versions.

 To format USB drive, attach the drive to your computer system, open Windows Explorer, right-click on the USB drive icon and select Format option.


This step is optional. If you don't want to format your USB drive, you can skip this step but make sure there is enough free disk space on your USB drive to copy Windows setup files.

STEP 2: Mount or Extract Windows Setup ISO Image File :

Now you'll need to extract all files from Windows setup ISO. You can extract the files using a file archive software such as 7-Zip, WinRAR, etc.

         By Using Win RAR or 7-Zip extract ISO file in a folder. or If you are using Windows 8 or later, you don't need to use any file archive utility, you can directmount the ISO file as a virtual drive in Windows Explorer. You can do this by right-clicking on ISOimage file and then selecting "Mount" option.


It will immediately mount the ISO file of Windows setup as a virtual DVD drive in Windows Explorer.

STEP 3: Copy Windows Setup Files to USB Drive :

Now you just need to copy all files from extracted or mounted Windows ISO to your USB drive.

 
That's all. You have successfully made a bootable USB drive which can be used for all purposes as mentioned in the beginning of the tutorial.

Monday, 3 November 2014

MAKE ANY YOUTUBE VIDEO OR PART OF A VIDEO INTO GIF IMAGE.

Standard

Make Any Youtube Video or Part of a Video into GIF image :


You can make any youtube video part into a gif image very easily. By creating a video into gif image you can set the image into your mobile desktop wallpaper you'll be unique from other mobile users. To turn youtube video into GIF image just add gif  just after www. in the URL. For Example :


 Once you type gif after www. URL press enter  then you'll be redirected to a simple gif image making webpage which has very simple user interface to understand how to create gif image of a youtube video part. simply select location from where and to which part you want to convert video into GIF image and click on create gif . That's it. It'll convert your youtube video part into GIF image. 


Sunday, 19 October 2014

5 Ways To Boost UP your internet Speed 100% working

Standard

Best and Efficient Ways Boost UP your internet Speed 100% working :


Slow internet browsing and Downloading speed , how irritating ? Are you suffering from low internet speed on PC while you trying to connect internet through 2G or 3G dongle( data modem). I am also using 2G network for blogging but i never feel my internet connection is very slow because i am using some tweaks to boost my internet speed. If you want to increase your internet speed , then follow my instructions: 

STEPS TO BOOST YOUR INTERNET SPEED :

warning : before changing anything, make sure to note down your default settings input, it would help you if these tricks doesn't work to you.
1] CHANGING DNS SERVER :

What is DNS?

Domain Name Server or DNS is a server which simply converts the names of websites into their address, IP Address. Could you open Doole wesite by typing 
173.194.36.34 in your browser? yeah! you can , but could you remember these long 10 digit number to access google? no, They are hard to remember. But could you 
use www.google.com to access Google? yeah! its easy to remember.

DNS server do this for you, it converts www.google.com to 173.194.36.34
so you came to know that DNS plays a major role in internet speed. By switching to a fast and powerful DNS server, you can impreove your internet experience along with speed.

How to change Domain Name in Windows XP :

1.Open Control Panel 
2.Switch to 'clasic view'. If you haven't yet.
3.Open 'netwik connections' by double clicking on it.
4.Now select your connection, if it is LAN then select Local Area Network or if it is Modem then select your modem.
5.Right click on your Network Connection, LAN or modem
6.select 'prperties'
7.properties dialog box will appear, now clock on 'Netwirking ' Tab
8.Double click on 'Internet Protocol(TCP/IP)
9.select 'Use the following DNS server addresses:'
10.Now in 'preferred DNS server' Paste the server addresses from given below lists'
11.In 'Alternate DNS sever' Paste Alternate DNS server assress below your preffered server'
12.Click OK, Again Click OK , If prompted again click OK
13.Restart your computer


How to change DNS server address in windows Vista, Windows 7 , Windows 8.1 and Windows 10 :

  1. Open Control Panel.
  2. On 'Network and Internet' click on 'View Network Status and Tasks' 
  3. A windows will open, in that window on the right side panel in the middle options you can see 'connections' Option click on it
  4. Another window will popup , on that windows click on 'properties'
  5. Go to 'Networking' tab
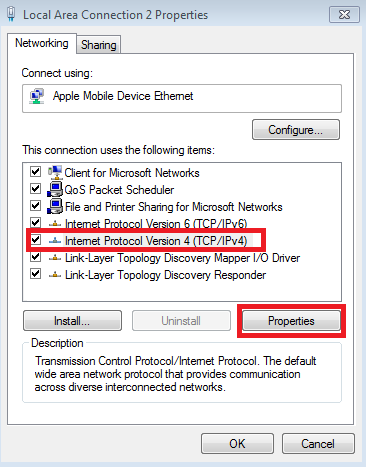
  6. Double click on 'Internet Protocol Version 4 (TCP/IPv4)
  7. A window will come , on that window select ' 'Use the following DNS server addresses:'
  8. Now in 'preferred DNS server' Paste the server addresses from given below lists'
  9. 9. In 'Alternate DNS sever' Paste Alternate DNS server addssress below your proffered server'
  10. Click OK, Again Click OK , If prompted again click OK
  11. Restart your computer.
TOP 10 high Speed DNS Server addresses : 

pate any following servers on proffered DNS server and Alternate DNS sever address.


Google:
Preferred DNS server - 8.8.8.8 
Alternate DNS server - 8.8.4.4 

Comodo DNS: 
Preferred DNS server - 8.26.56.26 
Alternate DNS server - 8.20.247.20 

Norton DNS: 
Preferred DNS server - 198.153.192.1 
Alternate DNS server - 198.153.194.1 

OpenDNS: 
Preferred DNS server - 208.67.222.222 
Alternate DNS server - 208.67.220.220

Level3: 
Preferred DNS server - 209.244.0.3
Alternate DNS server - 209.244.0.4 

ScrubIT3: 
Preferred DNS server - 67.138.54.120 
Alternate DNS server - 207.225.209.77 

OpenNIC4: 
Preferred DNS server - 69.164.208.50 
Alternate DNS server - 216.87.84.211 

Public-Root5: 
Preferred DNS server - 199.5.157.131 
Alternate DNS server - 208.71.35.137 

DNS Advantage: 
Preferred DNS server - 156.154.70.1 
Alternate DNS server - 156.154.71.1
SmartViper: 
Preferred DNS server - 208.76.50.50 
Alternate DNS server - 208.76.51.51

2] Configuring Bandwidth :

Most of the Windows computer users don't know that the Microsoft has reserved 20% of our internet bandwidth for some of their own purposes like Windows update. By doing some changes on Local group policy of Windows computers, we can use the internet connection's maximum bandwidth. 

Steps to perform to boost internet connection using microsoft by 20%:

  1. Click on Start Menu and type run and hit enter. ( Use Windows key + R )
  2. Type gpedit.msc on run command and hit enter.
  3. Now go to Local Group Policy --> Computer Configuration --> Administrative Templates --> Network. 
  4. Now double click on QoS Packet Scheduler 
  5. Then double click on Limit reservable bandwidth

6. Now  a window will come , on that window select 'enable' and then make bandwidth to '0(Zero)'. as like below picture:


Finally click on Apply and OK.

3] Turn OFF Automatic Updates :

While you are connected to internet , Microsoft silently using your internet by searching for updates , these are all for only decreasing your internet speed, Updating your PC is required but not forever, so turn OFF Automatic Updates when you need to get full internet speed for only your work.

How to Turn OFF Automatic Updates :

In Windows XP:

1.Open 'Control Panel'
2.Make sure you have 'classic view' enable
3.Double click on 'system'
4.Navigate to 'Automatic Updates' tab
5.From 'Automatic Updates' tab, Uncheck 'keep my computer Up to Date' and hit OK to sabe the settings


In Windows 7, 8.1 and 10 :

It is very easy to find the program in windows 7 , 8.1 and 10 ,
1.Go to search and Type 'automatic upadates' , you can find it right?
2.Go to change settings and in drop menu select 'Never check for Updates'
3.Click on OK.

That's it

4] Using Command Prompt as a Administrator :

By using some commands on cmd you can boost your internet speed , to perform boost using command prompt , you HAVE TO run cmd as a Administrator .

  1. Click on Start and Select all programs
  2. Click on accessories and select command prompt 
  3. Now,run cmd as administrator 
  4. Type following lines in command prompt and hit enter


netsh int tcp show global
netsh int tcp set global chimney=enabled
netsh int tcp set global autotuninglevel=normal
netsch int tcp set global congestionprovider=ctcp 


5] Disable Some Application which are using internet on your PC:

Some applications use your internet connection in background for many things such as checking for new updates, updating software eyc,
These applications will use your internet connection every time when you are connected with internet. Even though it is not required , you can increase the speed of internet by disabling internet access of this kind of applications.
How can you know which programs are accessing my internet connection?
Just follow the given simple steps :
1.       Download TCPEye software from HERE
2.      Install TCPEye in your Computer
3.      If you want to know which programs are using your internet connection, launch TCPEye program,
4.      When you will run TCPEye , you can see different processes which are using internet connection.
5.      If you want to block internet access for particular program , Right click on that process, and select end process.
6.      There might be too many SVCHOST process, it is suggested to terminate all the SVChost processes and leave only one SVSHost process.


That's it : follow all the above tips to get full speed of internet and if you can't just try to follow 1,2 and 3 steps.
    
All the very best 


Friday, 17 October 2014

Repair Damaged,Corrupted and not detecting SD card or USB Flash Drive and solve windows was unable to format the drive problem

Standard

How to Repair Damaged and not detecting SD card or USB Flash Drive and Solve Windows Was Unable to Format the Drive :

If your PC does not detecting your SD card or USB flash drive and you are thinking of buy a new one, just wait and try this before spending bucks on the new one. When we inserted a corrupted flash drive into the USB port and try to access it, it shows an error like this:

You need to format the disk in drive before you can use it.

When you click on the Format Disk and start the format, it displays the following error:
Windows was unable to complete the format.


If you also have similar kind of problem with your SD card or External hard drive or USB flash drive, then keep reading. I am going to demonstrate a method to fix corrupted storage devices. The windows was unable to format the disk because it has no specific file system (e.g. NTFS, FAT) associated with it. This drive is called RAW drive and it can be repaired by formatting the disk.

NOTE: Before moving further, please note that this will remove all data from your SD card/ flash USB drive permanently. If you have some important data, you can try some hard drive data recovery tools before trying this. There are many hard drive recovery softwares available for free which can recover data from USB drives and external hard disks. 


Before trying this method to repair your SD card, I would suggest you to try my previous method as it is easy and safe to perform. If that not work for you, you can come here and follow the below steps. Here is the link to my previous post

Windows was Unable to Format the Drive -Solution

If you are sure you do not have any important files on your drive and want to repair it by formatting, follow these steps:

1. Plug your drive into the USB port of your PC. Make sure only the damaged / corrupted SD card or USB flash drive is connected to PC and remove any other removable storage devices. 
2. Then Open the Computer window and note down the drive letter. As you can see in my case it is D 


3. Press Win Key + R to open Run box and type cmd. Hit enter and Command prompt window will launch. You can directly open command prompt by using the shortcut Win key + X and choosing Command prompt

4. Type diskpart and press enter. An warning message will show up, just click Yes and a new command prompt window will open with heading DISKPART. Now, you need to type all the commands in this window. 

5. Type list disk in order to list all the disk drives connected to your System. Detect your drive by its size as one will be of huge size(your Internal hard disk) and other will be your SD card/ USB flash drive. That’s why I asked you to remove all the other drives from your system. 


6.Next, You need to choose your corrupted disk drive. Perform this step very Carefully because if you select the wrong disk number by mistake, it can remove all the data from your internal hard disk. Type select desk "your disk number ".  As you can see, In my case it is  Disk 2 of size 8 GB, So I will type select disk 2 and hit enter


7. Next type clean and a message will displayed that Diskpart succeeded in cleaning the disk.

8.Next you need to type the command - create partition primary and hit enter. A success message will be displayed.


 9. After this type active and hit enter.


10.Now you need to execute the command select partition 1.

11.Finally, we are going to format the drive with file system FAT32 , so type format fs=fat32 and press enter.
 12.It will start formatting yout drive, it will take quite a long. Just minimize it and wait for format completion.

 When the format completes (100%), close the command prompt window and go to computer in order to check the drive. Verify your drive by compying some date in it. By this method, you can repair your corrupted SD Cards, USB flash drives and even your Extenal hard drives. Again , after performing above steps you will lose all your previous data, so, if  you have some important data in your drive, try to recover it first using hard drive recovery software. Here is the summary of all the above performed operations in cmd in order.
-diskpart
-list disk
-select disk ‘your disk number’
-clean
-create partition primary
-active
-select partition 1
-format fs=fat32


Thursday, 16 October 2014

Activate Windows 10 Technical Preview

Standard


Activate Windows 10 Technical Preview :

Yes, You heard right! now You Can Activate the Technical Preview of Windows 10 Operating System and After following my Activation Windows 10 Steps you are going to enjoy the full features of windows 10 on your PC.

Follow my instructions to activate windows 10 Technical preview :

First Download the ISO file of Windows 10 Operating System from the given below link :


Then install the Windows 10 on your PC . If you don't know how to install windows Operating System on your PC, Learn installation methods from blew link


Then Download the Activation file from Below link :


After successful installation completion of fresh copy of windows 10 on your PC , Right click on This PC and Go through properties, you’ll get noticed that your Windows is not activated.

OK, Now follow these instructions to Activate : 

Download the Above files and extract them into a safe folder . 

open the KMSpico 10 beta  folder .before you use kmspico Read the txt. file first, then double click on KMSpico_setup application, it’ll ask you to install it .

·         Disable any virus guards/Firewalls/Windows Smart Screen first
·         Download and install Activator
·         Now open ‘KMSELDI.exe’ from  ‘C:\Program Files\KMSpico\’ folder
·         Click tokens backup button which is with an arrow facing down icon (click yes in next message box)
·         After that click Red button
·         Wait till it says program completed ,activator will close itself ( if it freezes at some point, download and use the alternative KMS Activator we have given below)
·         Now you are Done!
·         Check your Windows 10 computer properties: D Activated!!
·         Restart to remove if watermarks are still there / Do not Uninstall KMSpico from your system!


See the below image for reference 


Restart your PC and check the system properties , Your windows is activated. 

If watermarks are still appear Use this watermark removal tool to remove all type of watermarks from windows 10 :

1. Run Windows 10 Watermark Remover
2. Tick "Remove all watermarks" checkbox at the top
3. Click 'Apply New Settings'
4. Restart PC when it will ask
5. Your Watermark will disappear !

See the below Picture for reference


Restart your system....TADA! Your Windows 10 is fully activated now ...you can enjoy the activated features of windows 10 from now....

see below..I have activated Windows 10 successfully by following above instructions 


Any doubts, queries, solution for problems comment below:::


About Us